6.7 KiB
Create your first note
We assume that you followed the previous tutorials for setting up an instance of HedgeDoc and created an user account. We assume the domain you use for the instance is https://hedgedoc.localhost, so please substitute it with your actual domain anywhere you encounter https://hedgedoc.localhost if that differs.
Creating a new note
-
Go to https://hedgedoc.localhost and log in. You should now be on the "explore page" within the "My notes" section.
-
Click on the "New Note" button in the top right. HedgeDoc will now create a new note for you and redirect you to the editor of this note.
 { width="400" }
 -
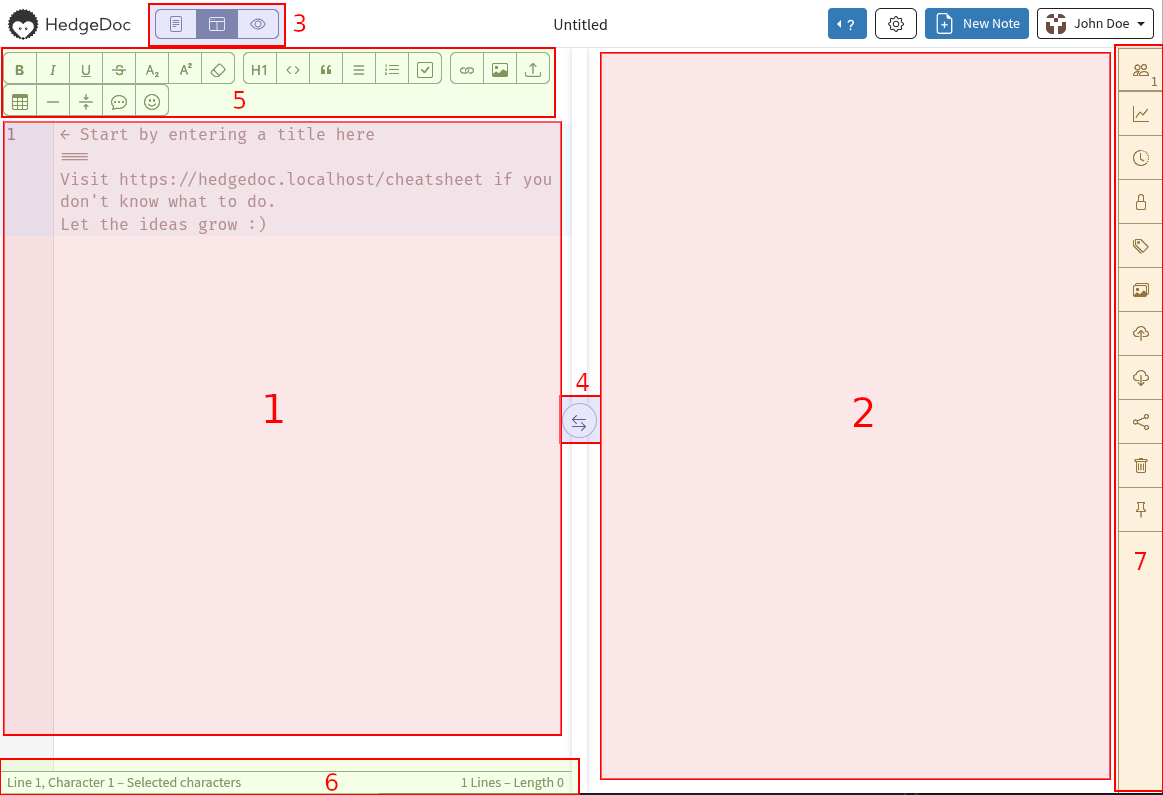
You are now in the editor, the main component of HedgeDoc. Let's explore the different parts of it now.
The editor
 { width="700" }
- Editor pane: You will write your note contents here on the left side. Notes are written in Markdown syntax.
- Renderer pane: The renderer pane on the right contains the rendered output from the markdown on the left side.
- View mode selection: You can choose if you want to see only the editor pane, only the renderer pane or both panes (the default). This setting will be remembered for future visits.
- Pane split resizer: Use the little arrow handle in the middle to resize the split between editor pane and renderer pane by dragging it to the left or right. You can always reset the split by clicking the middle view mode selector (3).
- Editor toolbar: The toolbar contains buttons to quickly insert markdown fragments into the editor at your current cursor position. It has buttons to upload an image or opening an emoji-picker too.
- Editor statusbar: The statusbar contains information about the current cursor position, selection and the note length.
- Sidebar: The sidebar contains all the important functionality to manage your note. There's for example the list of currently online people, the permission management, the possibility of importing or exporting the note content, and much more.
Writing markdown
Start by writing a few things in the editor pane on the left side. You will see the same content in the renderer pane on the right side.
Markdown uses a few characters to control how the output looks. One of them is the hashtag (#). When written at the beginning of a line, the following text is treated as a heading.
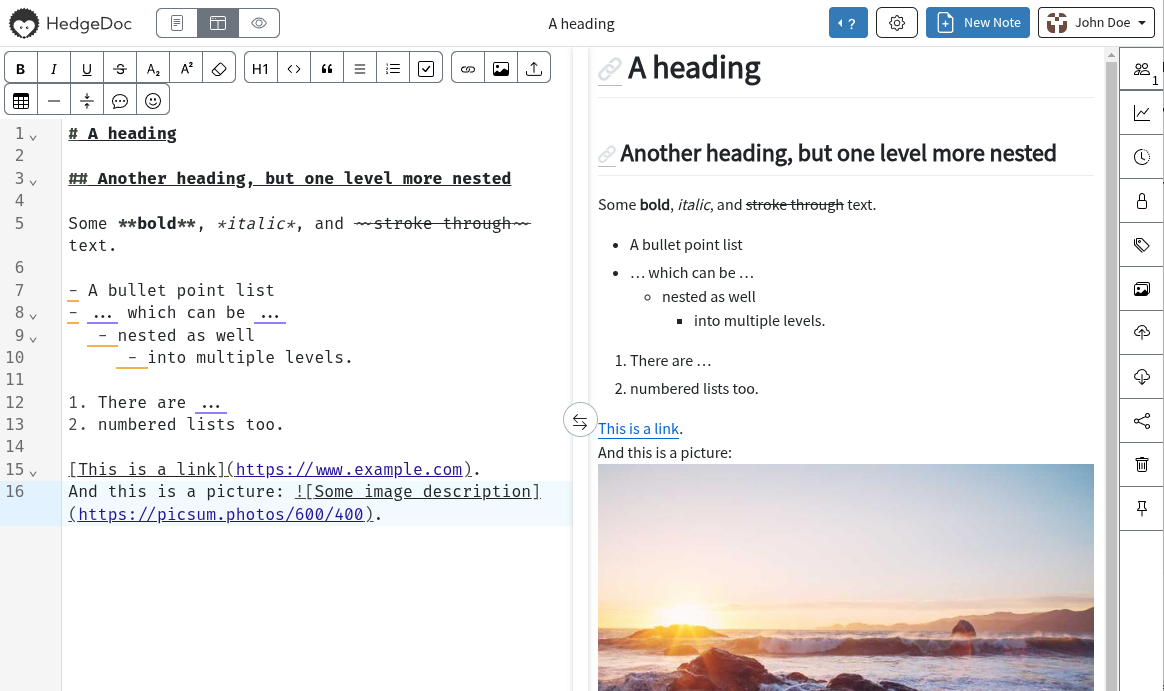
There are several more such control characters, so just copy the example below into the editor, to get a first gist about them:
# A heading
## Another heading, but one level more nested
Some **bold**, *italic*, and ~~strokethrough~~ text.
- A bullet point list
- ... which can be ...
- nested as well
- into multiple levels.
1. There are ...
2. numbered lists too.
[This is a link](https://www.example.com).
And this is a picture: .
The result should look like this:
 { width="700" }
You might have seen that the title in the middle of the top bar now says "A heading" instead of "Untitled". If not specified otherwise, the first heading of your note is used as the title of the note.
There's a whole lot more of things you can add to your note, from to-do lists, tables, flowcharts, to UML diagrams or simple sheet music. To discover the syntax for all these things, please refer to the Cheatsheet. It can be opened from the "Help menu", which opens when clicking the little button with the question mark at the top right.
Collaborate on the note
You might have seen that the URL now looks like this:
https://hedgedoc.localhost/n/a2gra3bsstrjjy5w0dk2k1q3y0.
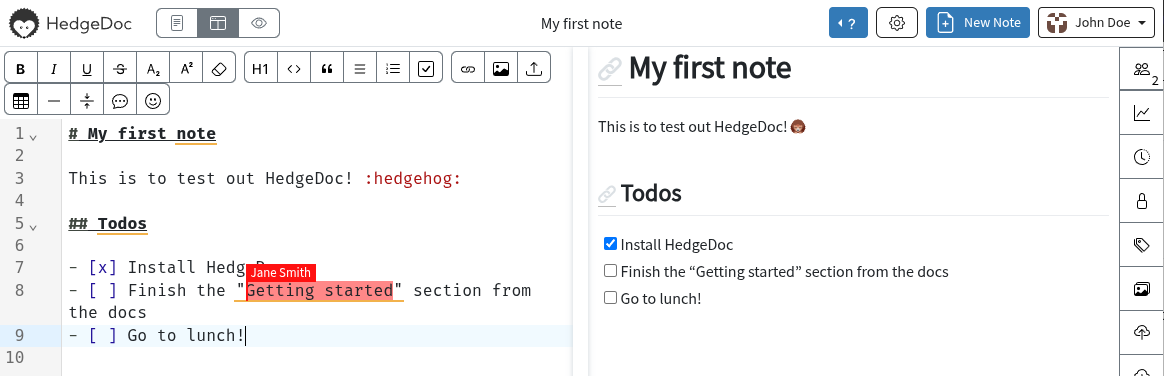
Each new note receives an unique identifier, that is added to the URL. You can share this URL with other people to work collaboratively with them. Changes done by one user are applied in realtime to all other users as well. There's no limit on how many users can participate on a note.
By default, users that also have an account on your instance have write access, while non-logged-in users only have read access. You can manage these permissions on a more granular basis, see the section about permissions below.
When another user with write access joins your note, you see their cursor too. Each person has another color, so it is easier to distinguish between multiple ones.
 { width="700" }
If you click the little icon with the persons in the sidebar, you get a list of the users which are currently working alongside you in the note. A little indicator circle next to the name shows whether the user currently has the editor focused (green) or not (red). This way you can quickly see who's actively writing in the moment.
Setting permissions
By clicking the little lock icon in the sidebar, you open the permissions management dialog. This allows you to configure who has access to your note, and especially who has write access and who only read access.
 { width="400" }
You can also transfer your note ownership to another user, if you like. The owner of a note, is the only one who can change the permissions or delete the note.
You can add other users by entering their username into the field "Add user" and submit through the plus-icon button. If a username does not exist, you'll see an error notification appearing in the top right of the app.
There are two special kinds of permission that you can set below the individual user permissions. The entry "All logged-in users" refers - as the name says - to the group of registered user accounts on the instance. This becomes useful, if you have a known group of users on your instance and registration disabled. The other entry "Everyone" means that this permission is applied to everyone who accesses the note by its URL. This means the URL should be treated like a secret in case of (write) access.